



How Do I Set a Static IP Address on Raspberry Pi?
If you're using your Raspberry Pi as a myServer 6 server, setting a static IP address will make things far easier.
If you’re using your Raspberry Pi as a home server or often need to access it remotely from another device, setting a static IP address for it is a very good idea. This means you’ll be able to find it at the same Raspberry Pi fixed IP address every time, rather than a new address being set dynamically whenever it is rebooted. This is also useful to avoid confusion when you have multiple Raspberry Pi devices connected to your network.
Fortunately, once you know how, it's a fairly simple and quick process to set a Raspberry Pi static IP address. We’ll show you how to change the IP address in Raspberry Pi OS to make it permanent.
What Is an IP Address?
An Internet Protocol (IP) address is used to uniquely identify each device on a computer network, or the network itself on the internet – more on that later. The IP address is normally written in ‘dot-decimal’ notation: four decimal numbers, each ranging from 0 to 255, separated by dots. An example is 192.168.1.107.
By default in Raspberry Pi OS, which is a Linux-based operating system, your Raspberry Pi’s IP address is reconfigured automatically each time you reboot it, so it may well change. Naturally, this is not ideal when you need a reliable address at which to connect to the Raspberry Pi from another device, such as when using it as a server. So it’s better to set a static IP address on Raspberry Pi.
Private vs. Public IP
A public IP address is used to identify your local network on the wider internet. This typically changes every time your router connects to the internet, although you may be able to make it static depending on your internet service provider.
You can find the public IP address on a Linux system such as Raspberry Pi OS by entering a special Terminal command, or simply by doing a web search for ‘What's my IP?’. It is only required if you intend to connect to a device from outside your network, which we won’t cover here.
Instead, we are looking at the private IP addresses used to identify each device on your own local network. While it may be possible to reserve a certain address for your Raspberry Pi in your wireless router’s settings for the same purpose, here we’ll be showing you how to set a static IP from the Raspberry Pi itself.
1. DHCP Configuration
Raspberry Pi OS (formerly know as Raspbian) uses DHCP (Dynamic Host Configuration Protocol) to assign an IP address to the Raspberry Pi automatically whenever it is rebooted. You can find out more in our guide to DHCP.
To change Raspberry Pi OS's behavior so that it uses the same static IP address each time, you will need to modify the configuration file for the DHCP client daemon, dhcpcd.conf.
Before that, you will need some information on your current network setup so you can add the required details to the configuration file. You will require the following info:
• The type of network connection. This is either wlan0 if your Raspberry Pi is connected to the router wirelessly, or eth0 if it’s connected using an Ethernet cable. On two ethernet port myServer 6 controllers (like myCapture6 systems), there might be another ethXYZABC.
• The Raspberry Pi’s currently assigned IP address – it’s safest to reuse this for its static IP so that you can be sure the latter hasn’t already been to another device on the network. If not, make sure another device isn't already using it.
To find the Raspberry Pi’s current IP address, enter the following command in a Terminal window:
hostname -I• Your router’s gateway IP address – the one used to contact it from the local network, not its public IP. It varies depending on the router model, but typically starts with 192.168.
To find it, enter the following command and note the first IP address given:
ip r | grep default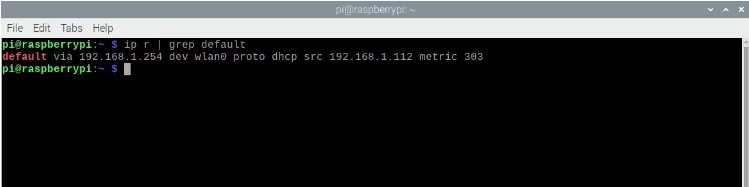
• Your router’s DNS (Domain Name System) IP address. This is typically the same as its gateway address, but may be set to another value to use an alternative DNS – such as 8.8.8.8 for Google, or 1.1.1.1 for Cloudflare.
To find the current DNS IP address, enter the command:
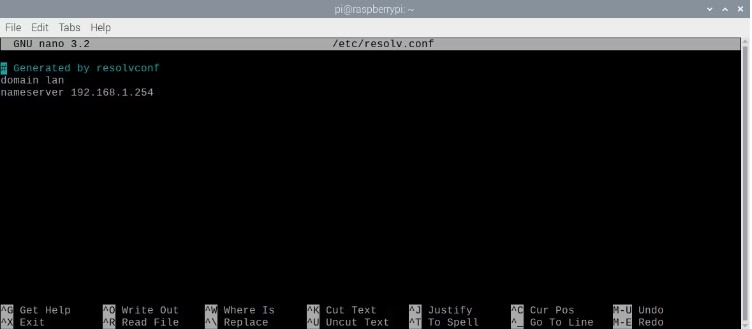
Note the IP address after nameserver – that's the DNS address – and then press Ctrl + X to close the file.
2. Add Static IP Settings
Now you have found all your network connection information, it’s time to edit the dhcpcd.conf configuration file to add the settings you need to set up a static IP address for your Raspberry Pi:
sudo nano /etc/dhcpcd.confIf you haven’t edited the file previously, it will mainly contain various comment lines preceded by a hash (#) symbol. At the bottom, add the following lines, replacing the emboldened names with your own network details:
interface NETWORK
static ip_address=STATIC_IP/24
static routers=ROUTER_IP
static domain_name_servers=DNS_IP
Replace the emboldened names as follows:
• NETWORK – your network connection type: eth0 (Ethernet) or wlan0 (wireless).
• STATIC_IP – the static IP address you want to set for the Raspberry Pi.
• ROUTER_IP – the gateway IP address for your router on the local network.
• DNS_IP – the DNS IP address (typically the same as your router’s gateway address).
Here is an example configuration to set the static IP to 192.168.1.120 with a wireless connection to a router at 192.168.1.254:
interface wlan0
static ip_address=192.168.1.120/24
static routers=192.168.1.254
static domain_name_servers=192.168.1.254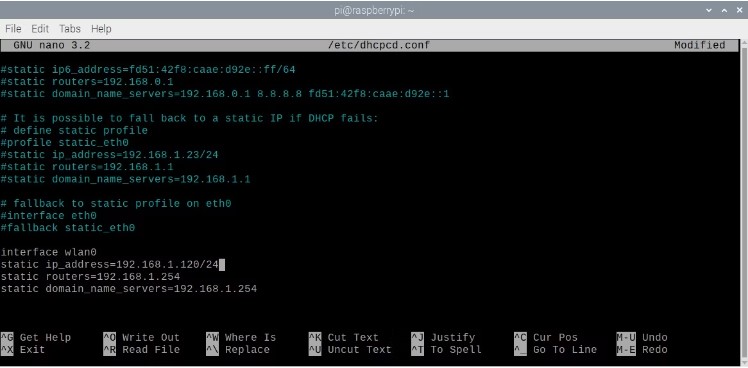
Once you have entered the settings, press Ctrl + X and then Y and ENTER to close and save the modified configuration file.
3. Reboot the Raspberry Pi
With the dhcpcd.conf configuration file modified, restart your Raspberry Pi to effect the changes and set the static IP address for it:
sudo rebootRather than using an address assigned automatically by DHCP, the Raspberry Pi will now attempt to connect to the router using the new static IP address that you set in the dhcpcd.conf file.
To check that it is working correctly, enter the following command:
hostname -IYou should now see the static IP address that you set in the dhcpcd.conf configuration file.
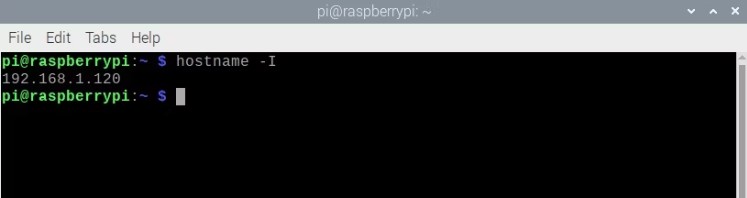
Set a Static IP Address: Success
Congratulations: you have set up a static IP address on your Raspberry Pi, and it should now retain that address automatically whenever it boots up. Now you can go ahead and use your Pi system as a myServer 6 controller, and connect to it reliably at the same Raspberry Pi fixed IP address every time.