



For most installations, a standard 19" equipment rack is used to securely and cleanly install most all of the electronics gear.
For these installations, Allonis recommends the myServer 6 1.5U Modular Rack mount package.
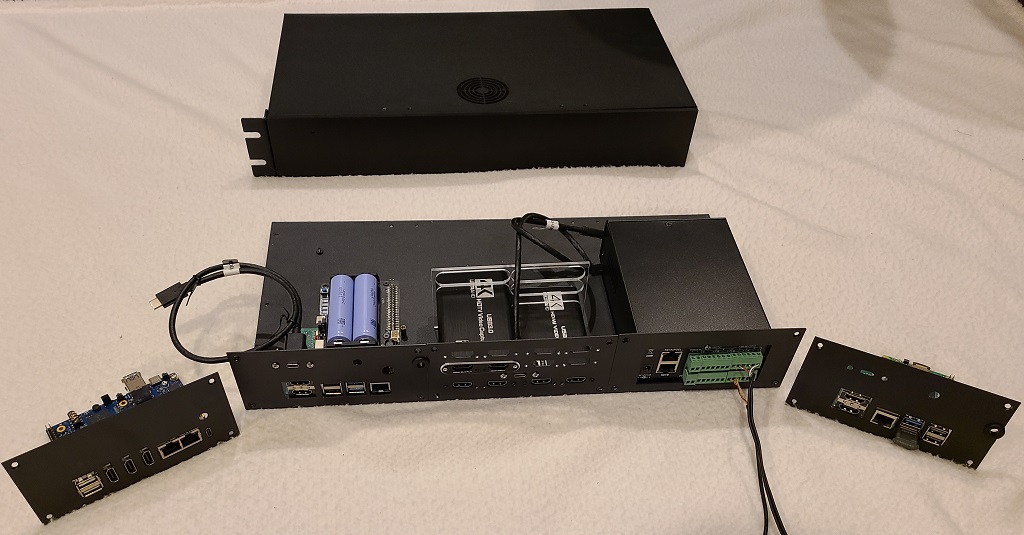
The Allonis Modular Case is in use for most of our commercial rack mount systems.
As the name implies it takes up a 1.5U (2.625") vertical space in the rack.
Up to 3 Raspberry Pi controllers (or optional back plates below) can be mounted. Blank plates are optionally available to fill the unused holes.
So, one of the Pi's can be the primary myServer 6 controller. For robust and critical installation, a secondary myServer 6 controller can be used as an automatic system backup.
Supports back plates for (left to right in above picture):
- OrangePi5Plus
- Pi4 (included) - shown with optional UPS HAT
- Allonis's myPreviewer 6 HDMI port capture hardware
- Allonis's AES67 4 analog / 4 digital audio processor (matrix)
- Pi5
Blank plates are included for any blank spaces in your case order. For the DIY hobbyists, feel free to hack up the blank to fit your XYZ hardware! Additional blanks are available if you change your mind.
Rack ears are removable to make the Modular Case a Shelf mount. Three 50MM fan locations are available depending on your devices to cool and rack configuration.
PIs can be used as myMediaPlayers. Or Digital Signage players. Or myAudioPlayers. Or IO devices. The list is long of services that the Allonis suite of products covers.
For the PIs, common is to use a GPIO fan to cool the processor. This is a critical component as without, the CPU will certainly overheat which will cause poor system performance and can be damaged permanently. Thankfully they are inexpensive and readily available to replace. Simply gracefully shut down the Operating System, unplug the PI's power supply and carefully remove the fan from it's GPIO pins. Replace it in reverse being careful to ensure all GPIO pins are aligned before pressing together. Power up the Pi to restore the system.
For installation, it is important for the equipment rack to be in a ventilated area with cool flowing air. Fans are available for equipment racks. The myServer 6 is happiest in the lower areas as heat rises. Ensure there is space around the Controller.
The myServer 6 controller (and all other PIs) should be connected to a UPS to ensure stable power even in the event of a power outage or brownout.
Smaller Shelf mount myServer 6 controllers are also available for smaller systems that include a 1TB M.2 boot drive.
Installation
The boot USB drive is in the plastic bag. This gets carefully inserted into the bottom blue USB3.0 slot. All of the programming is on this drive. The fit can be very tight and might need some gentle sidewards movement while inserting.
The internal case fan is connected to the USB2.0 black connection.
The myServer controller ethernet must be connected to an Internet accessible network cable for Allonis to remotely configure the system.
The system needs to be located in a cool area that has free flowing air to maintain proper temperature. Recommended is to not locate it next to power amplifiers that give off heat.
The myServer controller’s USB-C power supply is highly recommended to be connected to an Uninterruptible Power Supply (UPS) to ensure it does not get power cycled, which will corrupt the boot USB drive and the system won’t boot. Please do not power cycle the controller.
If you are going to connect a local HDMI monitor, only use the top HDMI port and insert it very carefully as the connector board is somewhat delicate. You can optionally also connect a wireless mouse / keyboard to the remaining black USB2.0 connection.
Serviceability
Hardware is generally replaceable without having to dissasemble the case.
To do so: Gracefully (via software) shutdown the system and unplug the power supplies.
Remove all cables from the myServer controller.
Remove the USB - this should be in the bottom Blue usb port (usb3.0 speed)
You can then remove the four phillips screws holding the back plate on.
Once the plate is off, you can swap the "GPIO" fan. It is held in place simply by it's 40 small pins. Carefully rock the fan "hat" up releasing it from it's pins. To replace, put the Fan on the top side (away from the Raspberry PI) and be VERY careful to align all 40 pins (ensure you are on both sets of 20 pins and that the starting pin is aligned with the fan's starting pins ie: all 40 pins are aligned) Then gently push the fan onto it's pins. Depending on the heat sink, the fan hat might be slightly lifted - this is fine.
The side fan can also be serviced by removing the four small allen head screws on the side of the case and replacing it. Be careful how the USB wire is routed so that it does not keep either fan from rotating.
The myServer controller can also be swapped by removing the small phillips head screws (typically 6) on the bottom of the case. Once the controller is removed, swap the brass standoff nuts to the new Raspberry PI. Be careful that there are two lengths of standoffs in most cases. Put the correct length in the correct spot on the new board. Replace it.
An audio DSP444 swap is a little harder to align the holes on the front of the DSP. Easy to remove, harder to put back. If the system will be in a rack, you may decide to not replace the two front / bottom screws and just keep it in place by the single phillips head screw holding the DSP to the back plate. Or, take the case apart to more easily align the front two bottom screws.
Once you have swapped hardware, rewire, put the USB back into the bottom Blue usb port and power the system back up. If the Raspberry Pi board was replaced, the system may need to be relicensed by Allonis. You will also need to provide the new TeamViewer ID that is found at: http://myServerIPaddress/dashboard on the top middle of the webpage.