



JTech / Zenty Video Over IP IP300 series of Transmitters / Receivers and Video controller
With the VoIP hardware one can build a huge network of video source devices feeding a virtually unlimited number of outputs (TVs). Adding Encoder adds network data traffic. Adding Decoders does not.
The system also supports video wall configurations.
It is also possible the send CEC TV on / off commands to simplify the network to just the one ethernet cable.
RS232 (serial data) can also be sent to a specified Receiver that is proximate to the RS232 controlled device (like to control all functions of the TV - not just the power).
Required:
One transmitter for each HDMI source device
One Receiver for each HDMI output device
One Video controller device for the total system. Version 1.23 or newer is required. System firmware 8.6.2 or newer.
myServer 6 automation controller
myServer 6 license units for each Receiver
Installation:
- Assemble the Transmitter Rack. Click HERE.
- Connect the specialized Video Ethernet Switch to power. Ideally user a Fiber connection to connect one switch to a second switch.
- Connect the Transmitters to the HDMI source devices using quality HDMI cables.
- Connect the Transmitters to the Video Ethernet Network Switch (the "Video Network") via quality Cat 6 or better cables
- Connect the Receivers to the HDMI TV Input using a quality HDMI cable. Preferable is to use the CEC compatible TV input if CEC TV control is needed.
- Connect the Receivers to the Video Ethernet Network Switch via quality Cat 6 or better cables
- Connect the POE port of the Video Controller to same Video Ethernet Network Switch
- Connect the Control port of the Video Controller to the Control Ethernet Network Switch (this is NOT the Video Ethernet Network Switch). This IP address must be static or Reserved DHCP so it never changes. This is the port myServer 6 controls the Video Matrix through.
- Boot system.
- Configure the HD over IP system. Here is a Tutorial.
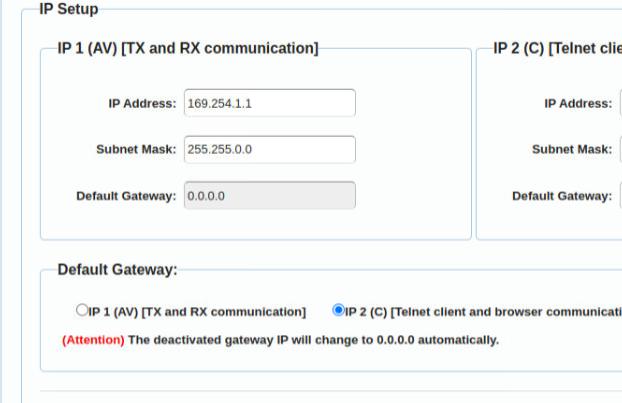
Here is what the Video Controller settings must look like:
NOTE:
- The HD over IP Video Controller does NOT issue IP addresses for TX and RX devices on the Video network. Therefore, they will be on a 169.x.x.x network. Optionally: the computer running the JTech Windows Video Over IP software must be networked directly to the Video Network Ethernet switch on the 169.x.x.x network to "see" the TX and RX devices. Link to download the Windows Video Over IP software
- You do NOT need to configure the video walls in the Windows Video Over IP configuration software. The Video Walls are defined in myServer's driver.
- TX and RX Alias's will populate the myServer driver device list. So you can configure those using the Windows Video Over IP Configuration utility.
- The control box defaults to 192.168.11.243 on its control port. You will need to put the controller on your local network before you can configure the system.
If you are having Allonis program your system, you don't need to do the below:
Install the JTech driver via myServer 6's Software Updater.
Once installed click the Driver
Define the controller manually
Discover all transmitters and receivers
Zone is for Input number for transmitters and Output numbers from 1-X
The Controller should aways be Zone 0
Sending a Power command to a Receiver sends a CEC discrete On or Off or a Toggle (if previously used to change the TV's state)
AV|126~Power~Toggle
If you want to turn All TVs On, AV|110~Power~AllOn, or AV|110~Power~AllOff when ID 110 is the HDIP video controller.
Example 2x2 video wall defintion command:
AV|<id>~CreateVideoWall~1~2x2~TL,TR,BL,BR~full~1
AV|110~CreateVideoWall~1~2x2~1,2,3,4~~~full~1
To switch a video wall to individual TVs:
AV|110~SetVideoWallMode~1~single