



The ESP32 supports the TOF1020 Time of Flight sensor allows for detection of objects up to 25cm from the sensor.
It requires I2C to be enabled on the ESP32
Example configuration file:
If the device can support multiple I²C buses (ESP32 has 2, ESP8266 does not support more than one) these buses need to be defined as below and sensors need to be setup specifying the correct bus:
 # Example configuration entry
 i2c:
   - id: bus_a
     sda: 13
     scl: 16
     scan: true
   - id: bus_b
     sda: 14
     scl: 15
     scan: true
# Sensors should be specified as follows
- platform: bme680
  i2c_id: bus_b
  address: 0x76
  # ...
Example wiring:
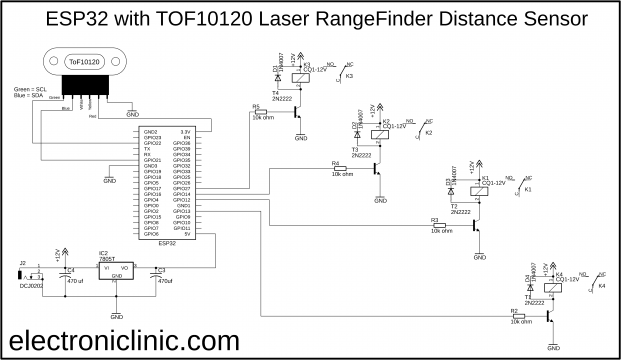
// ESP32 and TOF10120 Laser RangeFinder Distance Sensor
//download libraries
//https://www.electroniclinic.com/arduino-libraries-download-and-projects-they-are-used-in-project-codes/
#include<stdlib.h>
#include <SimpleTimer.h>
#include <Wire.h>
SimpleTimer timer1; // for TOF10120 Sensor
SimpleTimer timer2; // use to check if the distance value remains the same for 4 seconds
int secs = 0;
float setSensorValue = 0;
// for TOF10120 Laser Rangefinder Sensor
unsigned char ok_flag;
unsigned char fail_flag;
unsigned short lenth_val = 0;
unsigned char i2c_rx_buf[16];
unsigned char dirsend_flag=0;
int x_mm; // distance in millimeters
float f_value;
void setup(){
Serial.begin(9600);
Wire.begin();
timer1.setInterval(200L, TOF10120);
timer2.setInterval(1000L, SensorTime);
}
void loop(){
timer1.run(); // Initiates SimpleTimer
timer2.run();
}
void TOF10120()
{
for(int tof = 0; tof <= 9; tof++)
{
x_mm = x_mm + ReadDistance();
}
f_value = x_mm / 10;
//Serial.print(f_value);
//Serial.println(" mm");
x_mm = 0;
if ( (f_value < setSensorValue) || ( f_value > setSensorValue))
{
if ( secs == 4 )
{
setSensorValue = f_value;
}
}
if ( setSensorValue == f_value )
{
secs = 0;
}
Serial.print("Distance in mm: ");
Serial.println(setSensorValue);
}
int serial_putc( char c, struct __file * )
{
Serial.write( c );
return c;
}
void SensorRead(unsigned char addr,unsigned char* datbuf,unsigned char cnt)
{
unsigned short result=0;
// step 1: instruct sensor to read echoes
Wire.beginTransmission(82); // transmit to device #82 (0x52), you can also find this address using the i2c_scanner code, which is available on electroniclinic.com
// the address specified in the datasheet is 164 (0xa4)
// but i2c adressing uses the high 7 bits so it's 82
Wire.write(byte(addr)); // sets distance data address (addr)
Wire.endTransmission(); // stop transmitting
// step 2: wait for readings to happen
delay(1); // datasheet suggests at least 30uS
// step 3: request reading from sensor
Wire.requestFrom(82, cnt); // request cnt bytes from slave device #82 (0x52)
// step 5: receive reading from sensor
if (cnt <= Wire.available()) { // if two bytes were received
*datbuf++ = Wire.read(); // receive high byte (overwrites previous reading)
*datbuf++ = Wire.read(); // receive low byte as lower 8 bits
}
}
int ReadDistance(){
SensorRead(0x00,i2c_rx_buf,2);
lenth_val=i2c_rx_buf[0];
lenth_val=lenth_val<<8;
lenth_val|=i2c_rx_buf[1];
delay(100);
return lenth_val;
}
void SensorTime()
{
secs = secs + 1;
if ( secs == 5 )
{
secs = 0;
}
// Serial.println(secs);
}
Water Level measurement example:
// IoT Water Level Monitoring Using ESP32 WiFi + Bluetooth Module and TOF10120 Laser Distance Sensor
//download libraries
//https://www.electroniclinic.com/arduino-libraries-download-and-projects-they-are-used-in-project-codes/
#include<stdlib.h>
#define BLYNK_PRINT Serial
#include <BlynkSimpleEsp32.h>
#include <SimpleTimer.h>
#include <Wire.h>
SimpleTimer timer1; // for TOF10120 Sensor
SimpleTimer timer2; // for counting seconds and minutes
char auth[] = "YoX0h2rIJkZCOoQAvY4un4OZQ8Dw_0WZ";
/* WiFi credentials */
char ssid[] = "AndroidAP7DF8";
char pass[] = "jamshaid4";
// for TOF10120 Laser Rangefinder Sensor
unsigned char ok_flag;
unsigned char fail_flag;
unsigned short lenth_val = 0;
unsigned char i2c_rx_buf[16];
unsigned char dirsend_flag=0;
int x_mm; // distance in millimeters
int Sensor_actual_value;
float y_inches; // distance in inches
int secs;
int minutes;
int hours;
void setup(){
Serial.begin(9600);
Wire.begin();
Blynk.begin(auth, ssid, pass);
timer1.setInterval(1000L, TOF10120);
timer2.setInterval(1000L, Time_check);
}
void loop(){
timer1.run(); // Initiates SimpleTimer
timer2.run();
Blynk.run();
}
void TOF10120()
{
x_mm = ReadDistance();
Sensor_actual_value = x_mm;
x_mm = map(x_mm, 0,600,100,0);
Serial.println(x_mm);
Serial.print(" mm");
Blynk.virtualWrite(V2,x_mm);
Blynk.virtualWrite(V3,Sensor_actual_value);
// You can convert millimeters to inches in one of two ways: divide the number of millimeters by 25.4, or multiply the number of millimeters by 0.0394
// y_inches = x_mm * 0.0394;
// Serial.print(y_inches);
// Serial.println(" inches");
// Blynk.virtualWrite(V4,y_inches);
}
int serial_putc( char c, struct __file * )
{
Serial.write( c );
return c;
}
void SensorRead(unsigned char addr,unsigned char* datbuf,unsigned char cnt)
{
unsigned short result=0;
// step 1: instruct sensor to read echoes
Wire.beginTransmission(82); // transmit to device #82 (0x52), you can also find this address using the i2c_scanner code, which is available on electroniclinic.com
// the address specified in the datasheet is 164 (0xa4)
// but i2c adressing uses the high 7 bits so it's 82
Wire.write(byte(addr)); // sets distance data address (addr)
Wire.endTransmission(); // stop transmitting
// step 2: wait for readings to happen
delay(1); // datasheet suggests at least 30uS
// step 3: request reading from sensor
Wire.requestFrom(82, cnt); // request cnt bytes from slave device #82 (0x52)
// step 5: receive reading from sensor
if (cnt <= Wire.available()) { // if two bytes were received
*datbuf++ = Wire.read(); // receive high byte (overwrites previous reading)
*datbuf++ = Wire.read(); // receive low byte as lower 8 bits
}
}
int ReadDistance(){
SensorRead(0x00,i2c_rx_buf,2);
lenth_val=i2c_rx_buf[0];
lenth_val=lenth_val<<8;
lenth_val|=i2c_rx_buf[1];
delay(300);
return lenth_val;
}
void Time_check()
{
secs = secs + 1;
if ( secs >= 59 )
{
minutes = minutes + 1;
secs =0;
if(minutes == 2) // notification message is sent after every 2 minutes, change this number as per your requirement
{
if ( Sensor_actual_value >= 500) // if the tank is almost empty
{
Blynk.notify("Tank is empty");
secs = 0;
minutes = 0;
}
if ( Sensor_actual_value <= 300) // if half filled or the tank is full
{
secs = 0;
minutes = 0;
}
}
}
}